Introduction to Searing Steak
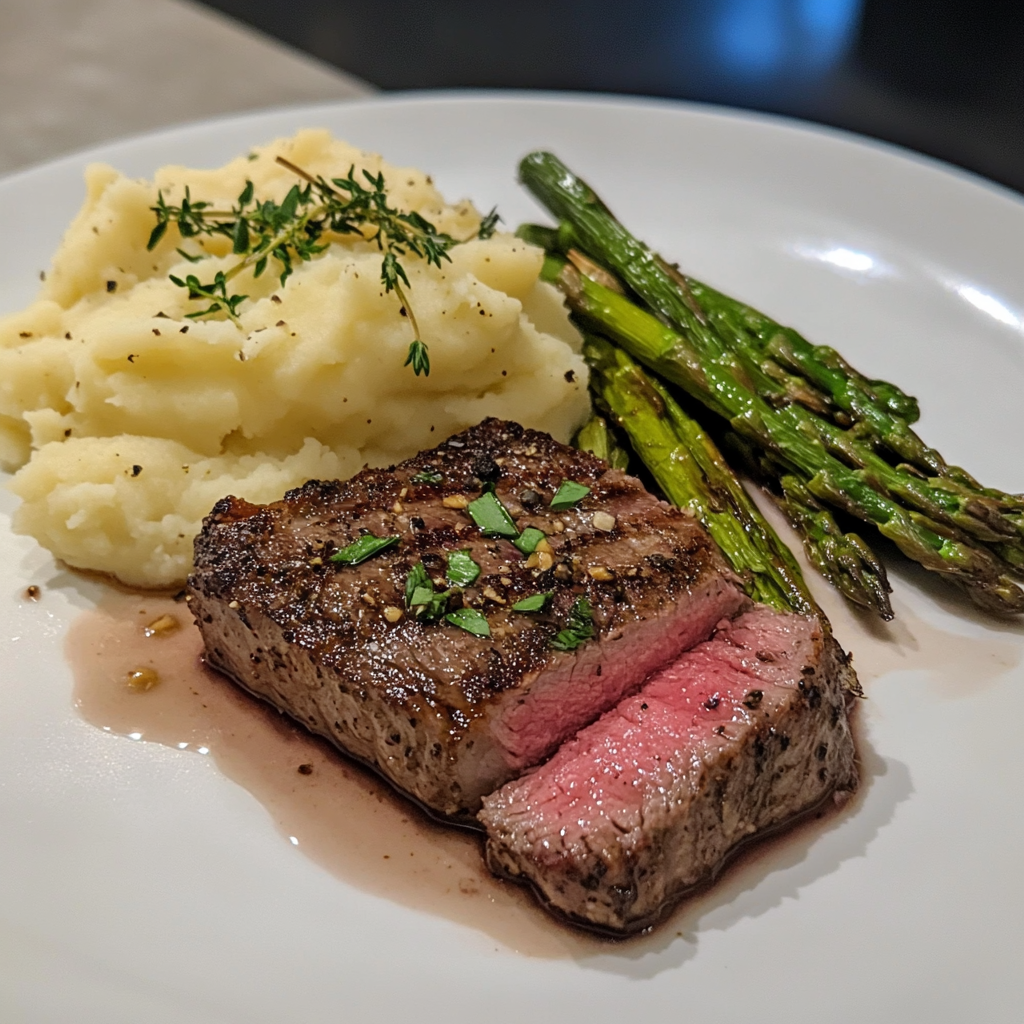
pan-seared steak is a foundational cooking technique that transforms a simple cut of meat into a flavorful, restaurant-quality dish. The process creates a caramelized crust that locks in juices while delivering an irresistible aroma and rich flavor. Whether you’re a seasoned cook or a beginner, mastering the art of searing is a game-changer for your steak preparation.

What Does it Mean to Sear a Steak?
Searing refers to the process of cooking the outer layer of steak at a high temperature to achieve a golden-brown crust. This is done by briefly cooking the steak in a hot skillet or on a grill without fully cooking the interior. The result is a beautifully caramelized exterior that enhances both flavor and texture.
For those who love a good steak with creamy flavors, try pairing your seared steak with Bertolli Alfredo Sauce for a rich and indulgent meal.
The Science Behind Searing: Maillard Reaction
- Chemical Magic: The Maillard Reaction is the chemical process that occurs when amino acids and reducing sugars in the steak interact at high heat. This creates complex flavors and the characteristic brown crust.
- Visual and Flavor Appeal: It’s not just about looks—this reaction is what gives a perfectly seared steak its rich, savory taste.
Why Searing is Crucial for Flavor
- Flavor Enhancement: Searing develops deep, umami-rich flavors that elevate the taste of the steak.
- Juice Retention Myth: While searing doesn’t actually “seal in juices,” it does contribute to the overall juiciness by creating contrast between the tender interior and crispy exterior.
- Presentation: A well-seared steak has an appealing texture and appearance that adds to the dining experience.
Mastering the searing process ensures that every steak you prepare is a culinary masterpiece, full of flavor and cooked to perfection.
Essential Tools and Ingredients for Searing Steak
Searing steak successfully requires the right combination of quality ingredients and reliable tools. By selecting the perfect cut and using proper equipment, you can achieve a flavorful crust and a tender interior with every steak.
Choosing the Right Cut of Steak
The cut of steak plays a significant role in achieving the ideal sear. Look for cuts that have good marbling and are of sufficient thickness for even cooking.
Tender Cuts: Ribeye, Strip, and Tenderloin
- Ribeye: Known for its rich marbling and bold flavor, ribeye is a favorite for searing.
- Strip Steak: Also called New York strip, this cut offers a balance of tenderness and flavor.
- Tenderloin: For a melt-in-your-mouth experience, tenderloin (or filet mignon) is an excellent choice.
Selecting Bone-In or Boneless Steaks
- Bone-In Steaks: Offer more flavor and help retain moisture during cooking, though they may take longer to cook.
- Boneless Steaks: Easier to handle and cook evenly, making them a convenient choice for beginners.
Marbling and Thickness: Keys to Perfect Sear
- Marbling: Intramuscular fat in the steak contributes to flavor and juiciness. Look for well-marbled cuts for the best results.
- Thickness: A steak at least 1 to 1.5 inches thick ensures a proper sear without overcooking the interior.
Tools You’ll Need for Searing
The right tools are essential for a seamless searing process, ensuring even cooking and maximum flavor.
Cast Iron Pan: The Preferred Choice
- Why It’s Ideal: A cast iron pan retains and distributes heat evenly, essential for achieving a golden-brown crust.
- Alternatives: Stainless steel pans can work, but avoid nonstick pans as they don’t handle high heat well.
Tongs for Easy Handling
- Control: Use sturdy tongs to handle the steak easily without piercing it, which can cause juices to escape.
- Length Matters: Opt for long-handled tongs to keep your hands safe from hot oil splatters.
Thermometer for Precision
- Essential for Doneness: A meat thermometer ensures your steak reaches the desired internal temperature without guesswork.
- Target Temperatures: Medium-rare is around 130–135°F, while medium is 135–145°F.
With the right ingredients and tools in hand, you’re well-equipped to sear a steak that’s as delicious as it is visually impressive. Quality cuts and dependable equipment make all the difference in achieving steak perfection.
Step-by-Step Guide to Searing Steak
Searing steak requires precision and patience to achieve a flavorful crust and a tender interior. Follow this detailed guide to ensure perfect results every time.
Preparing Your Steak
Before searing, proper preparation ensures even cooking and enhances the flavor of the steak.
Bringing Steak to Room Temperature
- Why It’s Important: Letting the steak sit at room temperature for 20–30 minutes helps it cook evenly, reducing the risk of a cold center.
- Tip: Cover the steak lightly with plastic wrap or parchment paper while it sits.
Patting Dry and Seasoning Generously
- Pat Dry: Use paper towels to remove excess moisture from the surface of the steak. A dry steak sears better, creating a crisp crust.
- Season Well: Generously coat the steak with salt and freshly cracked black pepper. Optionally, add garlic powder, smoked paprika, or herbs for extra flavor.
Choosing the Right Oil with a High Smoke Point
- Best Choices: Use oils like canola, avocado, or grapeseed oil, as they withstand high heat without burning.
- Avoid: Oils like olive oil or butter, which have lower smoke points and can burn during searing.
The Searing Process
The searing process involves precision timing and heat control to achieve the ideal crust.
Preheating Your Pan: Achieving the Perfect Heat
- Why It’s Key: A properly preheated pan ensures that the steak sears rather than steams.
- How to Test: Heat your cast iron pan on medium-high until a few drops of water sizzle and evaporate immediately.
Placing the Steak and Timing Each Side

- Placing the Steak: Gently place the steak in the hot pan without moving it for the first 2–3 minutes. This allows the crust to form.
- Timing: Sear the steak for 3–4 minutes per side for medium-rare, adjusting the time slightly based on thickness and desired doneness.
- Visual Cue: The steak should easily release from the pan when ready to flip. If it sticks, give it more time.
Avoiding Overcrowding the Pan
- Why It’s Important: Overcrowding reduces the pan’s temperature, causing the steak to steam instead of sear.
- Solution: Cook steaks one or two at a time, leaving enough space between them.
Finishing Touches
Adding the final elements enhances flavor and presentation.
Adding Butter and Aromatics for Basting
- How to Baste: Add a pat of butter, crushed garlic cloves, and sprigs of fresh thyme or rosemary to the pan during the last minute of cooking. Tilt the pan and spoon the melted butter over the steak for added flavor.
Resting the Steak to Lock in Juices
- Why Resting Matters: Let the steak rest for 5–10 minutes on a cutting board before slicing. This allows the juices to redistribute, ensuring a moist and flavorful steak.
- Tip: Cover loosely with foil to keep the steak warm while resting.
By following these steps, you’ll master the art of searing steak, creating a dish that’s rich in flavor, perfectly cooked, and sure to impress.
Tips and Techniques for a Perfect Sear
Searing steak is both an art and a science. These expert tips and techniques will help you achieve a flawless crust and perfect doneness while avoiding common mistakes.
Achieving the Perfect Crust
Creating a golden-brown crust is the hallmark of a perfectly seared steak. Proper heat management and careful handling are key.
The Role of High Heat in Crust Formation
- Why It Matters: High heat initiates the Maillard Reaction, caramelizing the steak’s surface for a flavorful crust.
- Tip: Preheat your pan until it’s very hot—test by sprinkling a few drops of water to ensure they evaporate instantly.
Avoiding Overturning or Pressing the Steak
- Let It Cook: Avoid flipping the steak multiple times; let each side cook undisturbed for 2–4 minutes to develop a proper crust.
- No Pressing: Refrain from pressing down on the steak with tongs or a spatula, as this forces juices out and compromises the crust.
Monitoring Doneness Without Cutting
- Thermometer Is Key: Use an instant-read thermometer to check the internal temperature without cutting into the steak.
- Target Temperatures: Medium-rare is 130–135°F, medium is 135–145°F.
Common Mistakes to Avoid
Even minor missteps can affect the quality of your steak. Avoid these common mistakes to ensure a perfect sear.
Overcrowding the Pan
- Why It’s a Problem: Placing too many steaks in the pan lowers the temperature, leading to steaming instead of searing.
- Solution: Cook in batches if necessary, leaving enough space between steaks for proper heat distribution.
Using the Wrong Type of Oil
- Why It Matters: Oils with low smoke points, like olive oil, can burn during searing and impart an unpleasant taste.
- Best Options: Choose high-smoke-point oils like canola, avocado, or grapeseed oil for optimal results.
Skipping the Resting Step
- The Risk: Cutting into a steak immediately after cooking allows the juices to escape, leaving the meat dry.
- How to Rest: Let the steak rest for 5–10 minutes, loosely covered with foil, to lock in juices and ensure maximum flavor.
Variations and Enhancements
Elevate your seared steak by experimenting with flavors, pairings, and sides. Whether you’re adding herbs, creating custom rubs, or choosing complementary sides, these variations and enhancements will transform your steak into a gourmet masterpiece.
Flavoring the Steak
Enhancing the natural flavor of steak is easy with the right additions and techniques.
Adding Garlic, Thyme, and Rosemary for Depth
- Aromatic Basting: During the last minute of searing, add crushed garlic cloves, fresh thyme, and rosemary to the pan along with a pat of butter. Baste the steak with the infused butter for a rich, herbal flavor.
- Tip: Fresh herbs and garlic create a subtle depth of flavor that doesn’t overpower the steak.
Marinades and Dry Rubs: Customizing Flavor
- Marinades: Use a blend of olive oil, soy sauce, garlic, and citrus juice to tenderize the steak while infusing it with tangy flavors.
- Dry Rubs: Combine spices like smoked paprika, garlic powder, and cayenne pepper for a flavorful crust.
Pairing with Compound Butter
- Why It Works: Compound butter, mixed with herbs, garlic, or blue cheese, adds a luxurious finish to the steak as it melts over the hot surface.
- Examples: Garlic-parsley butter or chive-blue cheese butter pairs beautifully with seared steak.
Pairing Steak with Sides and Sauces
The right accompaniments elevate your steak, creating a balanced and satisfying meal.
Classic Sides: Mashed Potatoes, Asparagus, or Salad
- Mashed Potatoes: Creamy mashed potatoes provide a hearty, comforting contrast to the rich steak.
- Asparagus: Grilled or roasted asparagus adds a fresh, slightly smoky flavor.
- Simple Salad: A crisp, fresh salad with vinaigrette complements the steak without overpowering it.
Sauces: Béarnaise, Chimichurri, or Peppercorn
- Béarnaise: A creamy, buttery French sauce with tarragon pairs elegantly with steak.
- Chimichurri: This Argentinian herb-based sauce adds a zesty, tangy kick.
- Peppercorn Sauce: A rich, spicy sauce made with cream and crushed peppercorns enhances the steak’s natural flavor.
Modern Twists: Grilled Vegetables or Herb Pesto
- Grilled Vegetables: Pair your steak with charred zucchini, eggplant, or bell peppers for a healthy, modern side.
- Herb Pesto: A bright, garlicky pesto made with basil, parsley, or cilantro provides a vibrant twist.
With these variations and enhancements, you can customize your steak experience to suit any palate or occasion, creating memorable meals that go beyond the basics.
ThermoWorks Meat Thermometers – Essential for ensuring perfect internal temperatures.
Frequently Asked Questions (FAQs)
Here are answers to common questions about searing steak, designed to help you master this essential cooking technique.
Common Questions About Searing Steak
How Do I Know When My Steak is Done?
- Using a Thermometer: The most accurate way is to use an instant-read meat thermometer.
- Medium-Rare: 130–135°F
- Medium: 135–145°F
- Touch Test: Gently press the steak; a medium-rare steak will feel slightly firm with some resistance.
What’s the Best Way to Sear a Thick Steak?
- Reverse Sear Method: Cook the steak in the oven at a low temperature until it reaches just below your desired doneness, then sear it in a hot pan to develop a crust.
- Key Tip: Ensure the steak is at least 1.5 inches thick for the best results.
Can I Sear Steak Without a Cast Iron Pan?
- Alternatives: While a cast iron pan is ideal for its heat retention, you can use a stainless steel skillet as a substitute. Avoid nonstick pans as they can’t handle high heat well.
- Grilling Option: Searing on a grill also works well, especially for large cuts.
Should I Sear Steak Before or After Cooking?
- It Depends on the Method:
- Sear First: Traditional method for thinner steaks, locking in flavor at the start.
- Sear After: Part of the reverse sear technique for thicker cuts, ensuring even cooking and a perfect crust.
Is It Necessary to Use Oil for Searing?
- Yes, But Choose Wisely: Use oils with high smoke points, like canola, avocado, or grapeseed oil. These oils prevent sticking and ensure even browning without burning.
- No Oil Alternative: If your steak has enough fat, such as a ribeye, it can render during cooking and reduce the need for additional oil.
By addressing these common questions, you’ll gain the confidence and knowledge to sear steak perfectly every time.
Conclusion: Why Searing Steak is a Skill Every Cook Should Master
Searing steak is more than just a cooking method—in fact, it’s an essential skill that transforms a simple cut of meat into a flavorful masterpiece. Additionally, the golden crust, achieved through the Maillard Reaction, enhances both taste and texture, while the process itself unlocks your steak’s full potential.
Moreover, by mastering the art of searing, you can ensure that your steaks are cooked to perfection, whether for an everyday meal or a special occasion. Ultimately, it’s a versatile technique that every cook should have in their culinary repertoire.

